Month: June 2024

Tales of Home DIY: Workspace Refresh

You know that meme of the skeleton at the bottom of the sea? I know that’s some of y’all, waiting for an update on our basement renos. As the old lady said, it has been 84 years … in this case, since we started that project. And about 82.5 years since the project achieved 90% completion. But today is not the day that I announce that particular wait to be over. In the circumstances, it might seem strange that I should be talking about a different home DIY project today, but trust me – it’s very on-brand for us. Or, I should say, for my husband; he loves to start things, hates the finicky finishing work, and also refuses to lower his standards for finishing work. He assures me that he is not alone, hence why, in construction, “substantial completion” occurs when the work is 90% done. I am not really in a position to challenge him, seeing as how he does most of the work.

Anywaaaaay.

New project.

This had been on our radar for some time, but the timing was sort of forced on us. I’ll come back to that later. To start at the beginning: back in early 2020, like most people, I scrambled to put together a working space for myself when, unexpectedly, I had to pivot to WFH. This space ended up being set up in my bedroom, where my husband hastily hacked together some IKEA pieces to create a table that could be set up next to my existing vanity. It was not a proper desk by any stretch of the imagination (it had no drawers and I had to use the very shallow one in my vanity to store pens, paper, etc.), but it provided me the bare necessities. Four years later, I am still 100% WFH and figured it was time to create a better office set-up – something that would accommodate my working needs, and also look nicer as part of the bedroom.

Of course, I don’t have a proper “before” photo of the old space, but here’s a shot of the gallery wall above my desk; you can see the top of the vanity to the left, and the shelf that we added above my desk. (The computer monitor is blocked out.)

The original inspiration for our project was the mid-century modern modular wall units that my husband and I both love:

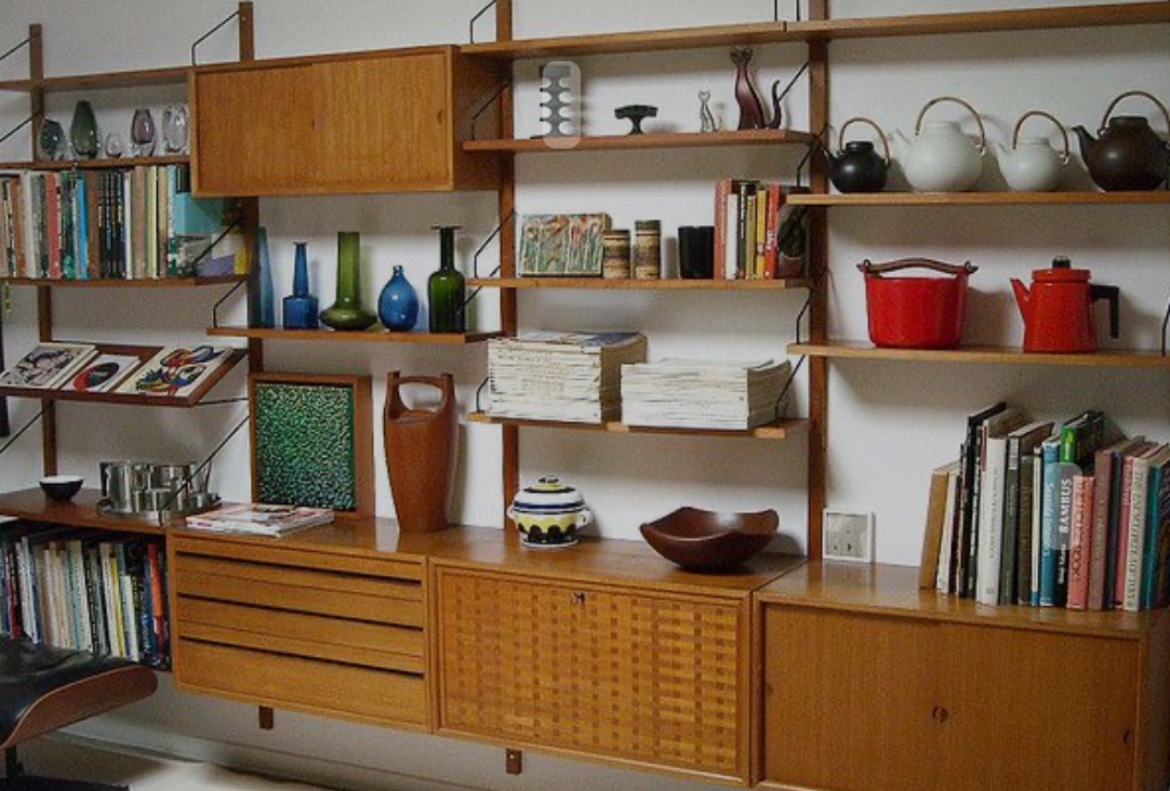
Some of them came with a little desk area; alternatively, we thought one could be hacked to add a desk. The problem is that these units are (a) hard to find, and (b) hella expensive. Forget the original Danish versions; even a repro can run to multiple thousands for the wall span we are dealing with, and customization would be limited. My husband’s first idea was to try to build one himself, from scratch, based on our own design. The material would still cost a fair bit, but we would be able to fully customize and also save on the labour. Because of the work involved, the project was back-burnered. Then, my husband had another idea: to create a contemporary equivalent using pre-made IKEA pieces. It always comes back to an IKEA hack for us. The convenience is hard to beat. He had his eye on the Elvarli wardrobe system, which had the most potential. Indeed, I have seen photos where it’s been used by professional interior designers to create living room wall units and room dividers – it’s more versatile than its official classification would suggest (which, frankly, is true of most IKEA pieces). Still, the project remained a secondary priority because we had other stuff on the go, not least of all the basement.

But then life made other plans for us. The Elvarli system went on major sale at IKEA. My husband has learned the lesson of never letting a good sale pass – you never know if it will happen again and, with inflation these days, it’s never guaranteed to be as good in the future. So, we went and bought everything … and because we have nowhere to store extra construction material, we had to build it, too.

I am using the royal “we”, of course. I did help, though. Holding up poles, passing tools, and providing sparkling conversation.

Unlike most of our projects, this one was actually 100% completed … in under a week, no less. The construction itself took about a day, with a bit of extra install on a second day after we changed the design part-way through. The prep actually took longer, because we not only had to move all of the existing furniture out of the way, we also have that massive gallery wall to take down and patch up. This particular wall has actually seen a series of galleries over the 14 years we’ve been living in this house, so there were about a bazillion holes of different sizes to fix and paint over. That took quite a few hours, spread over about 3 or 4 days. Once the space was ready, the unit went up relatively quickly though it was a bigger pain-in-the-you-know-what than other IKEA systems we’ve used in the past. My husband complained that the assembly instructions were incredibly poor, so he had to figure out most of the work himself. Working with a popcorn ceiling was not easy either – the poles that hold up the unit have to be screwed into the ceiling. Anyway, once those were up, the rest was quite easy.

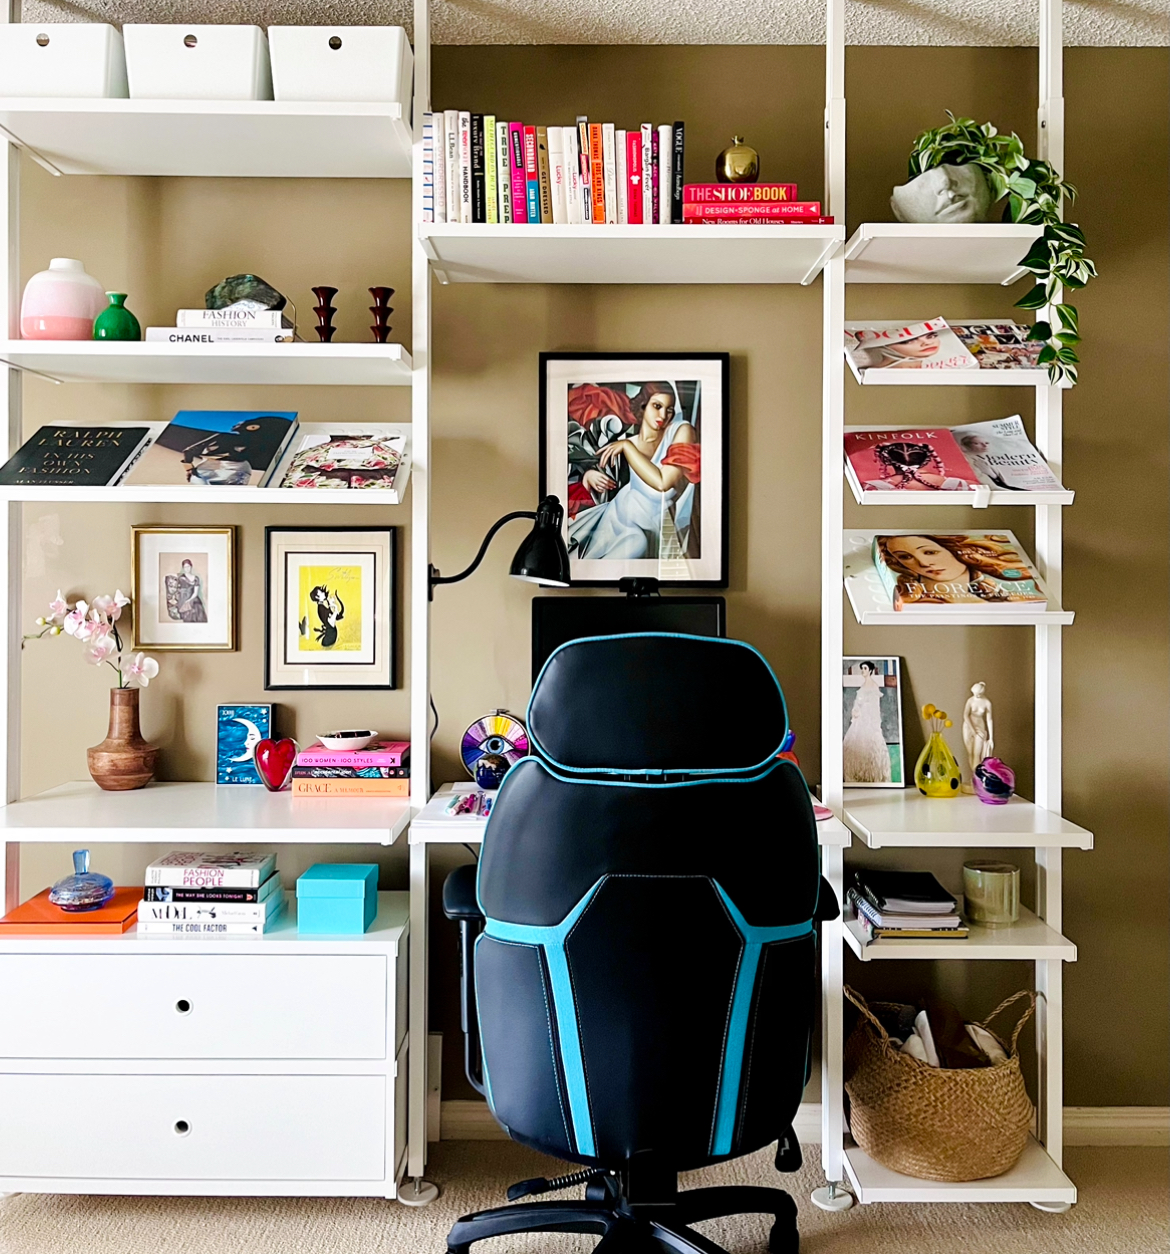
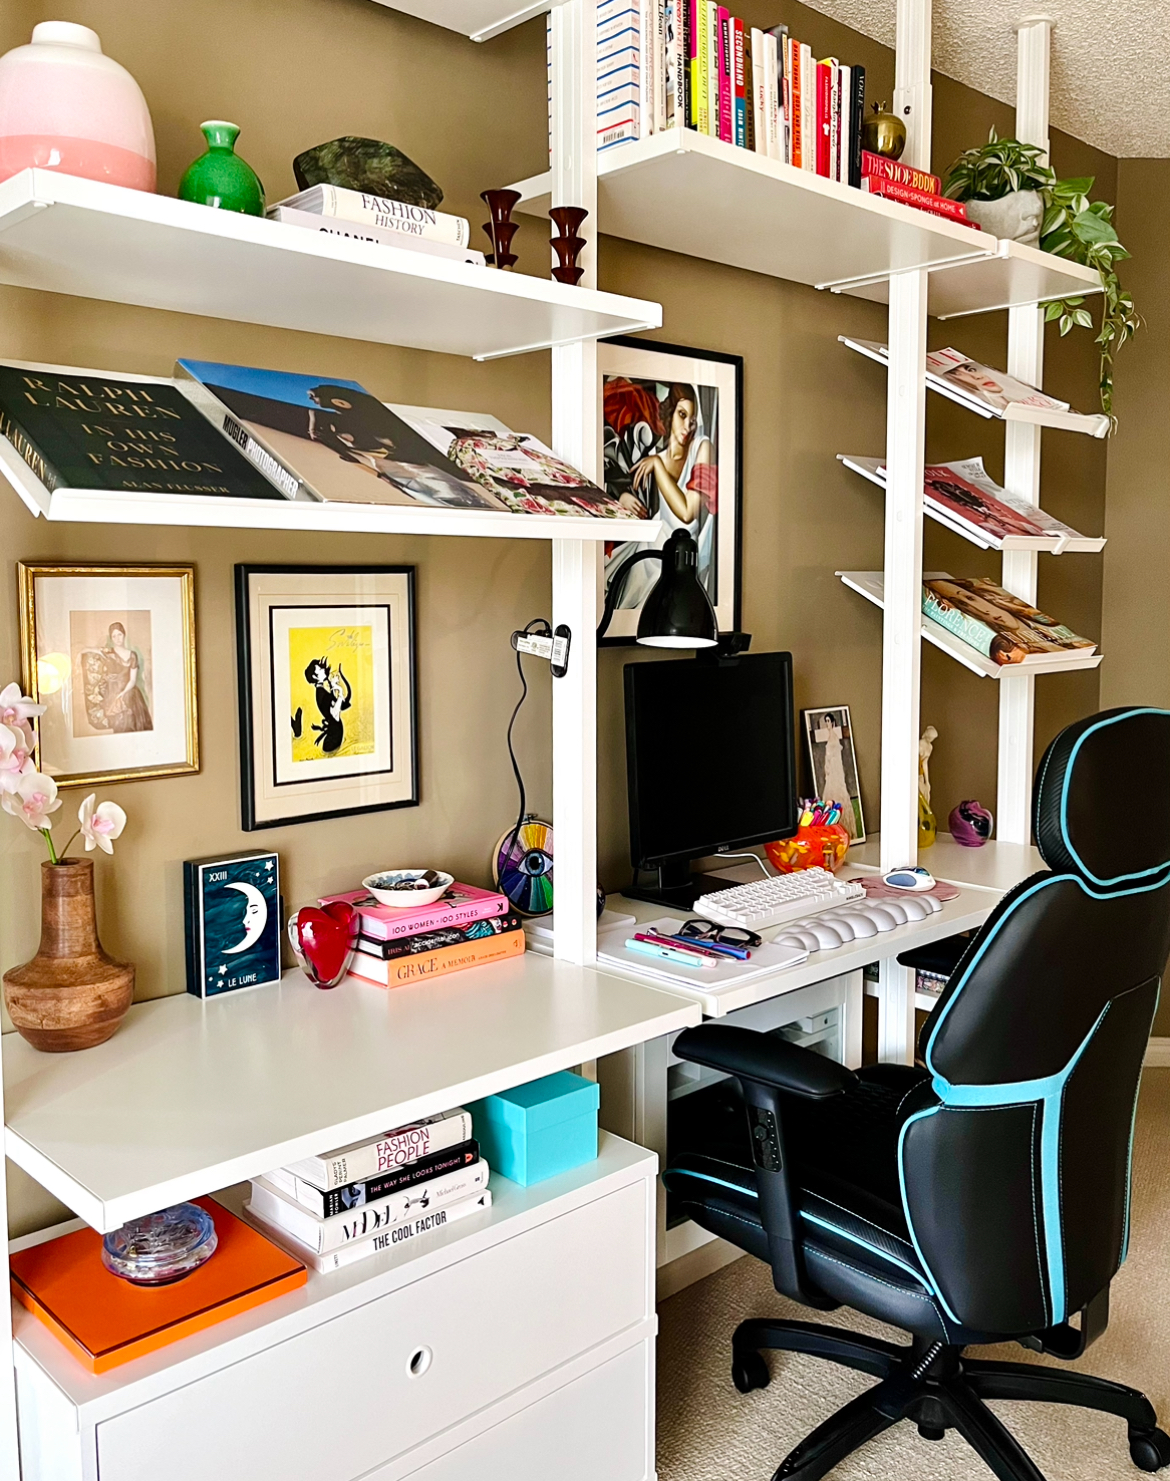
For anyone interesting in the practical details, we used 4 poles to create 3 bays: 2 large ones and a smaller one. We used the deep version of the Elvarli system shelf to create a desk/work surface that effectively extends across all 3 bays, albeit with small gaps in between (due to the poles). This shelf is 20 inches deep and about 32 inches wide (on a large bay), which is sufficient for my pretty minimalist work set-up. I may end up getting a new computer monitor with a slimmer profile, which would free up a bit more desktop space. We decided to use the shallower shelves everywhere else, above and below the “desk”, which resulted in a recessed design that looks nicely balanced. We had originally bought deep shelves for the upper part of the unit, but after installing the first one, changed our minds; it felt too much like an overhanging canopy. The shallower shelves are still fairly wide (14 inches) so they provide plenty of storage room. I also like how they looked on the bottom part of the unit, sort of tucked back under the desk. Again, we were initially going to install the deep drawers on the bottom left bay, but they were out of stock; after we saw how nice the shallower shelves looked on the bottom right bay, we decided to switch to the shallower drawers instead — and they were in stock! All in all, we used 10 shelves, 2 drawers, and 4 shoe racks. The shoe racks are my favourite! I have seen similar slanted shelves used in wall units to display books, and I knew I wanted to incorporate that element into my version.

This configuration has massively increased the available storage space. In fact, I was able to do a little reorg of another storage unit in the bedroom and better organize a variety of things, including some clothes, craft stuff, office stuff, and other personal items. The highest shelf on the wall unit, which isn’t the most accessible, is now storage for all my sentimental paperwork — birthday cards, letters, old diaries, etc. Moving all that stuff there had a domino effect of clearing out space elsewhere. I’m very pleased to have found those white bins (also IKEA) that match the design of the drawers below. It makes everything look cohesive.

My main job, as always, was to style the shelves. I think I did pretty well.

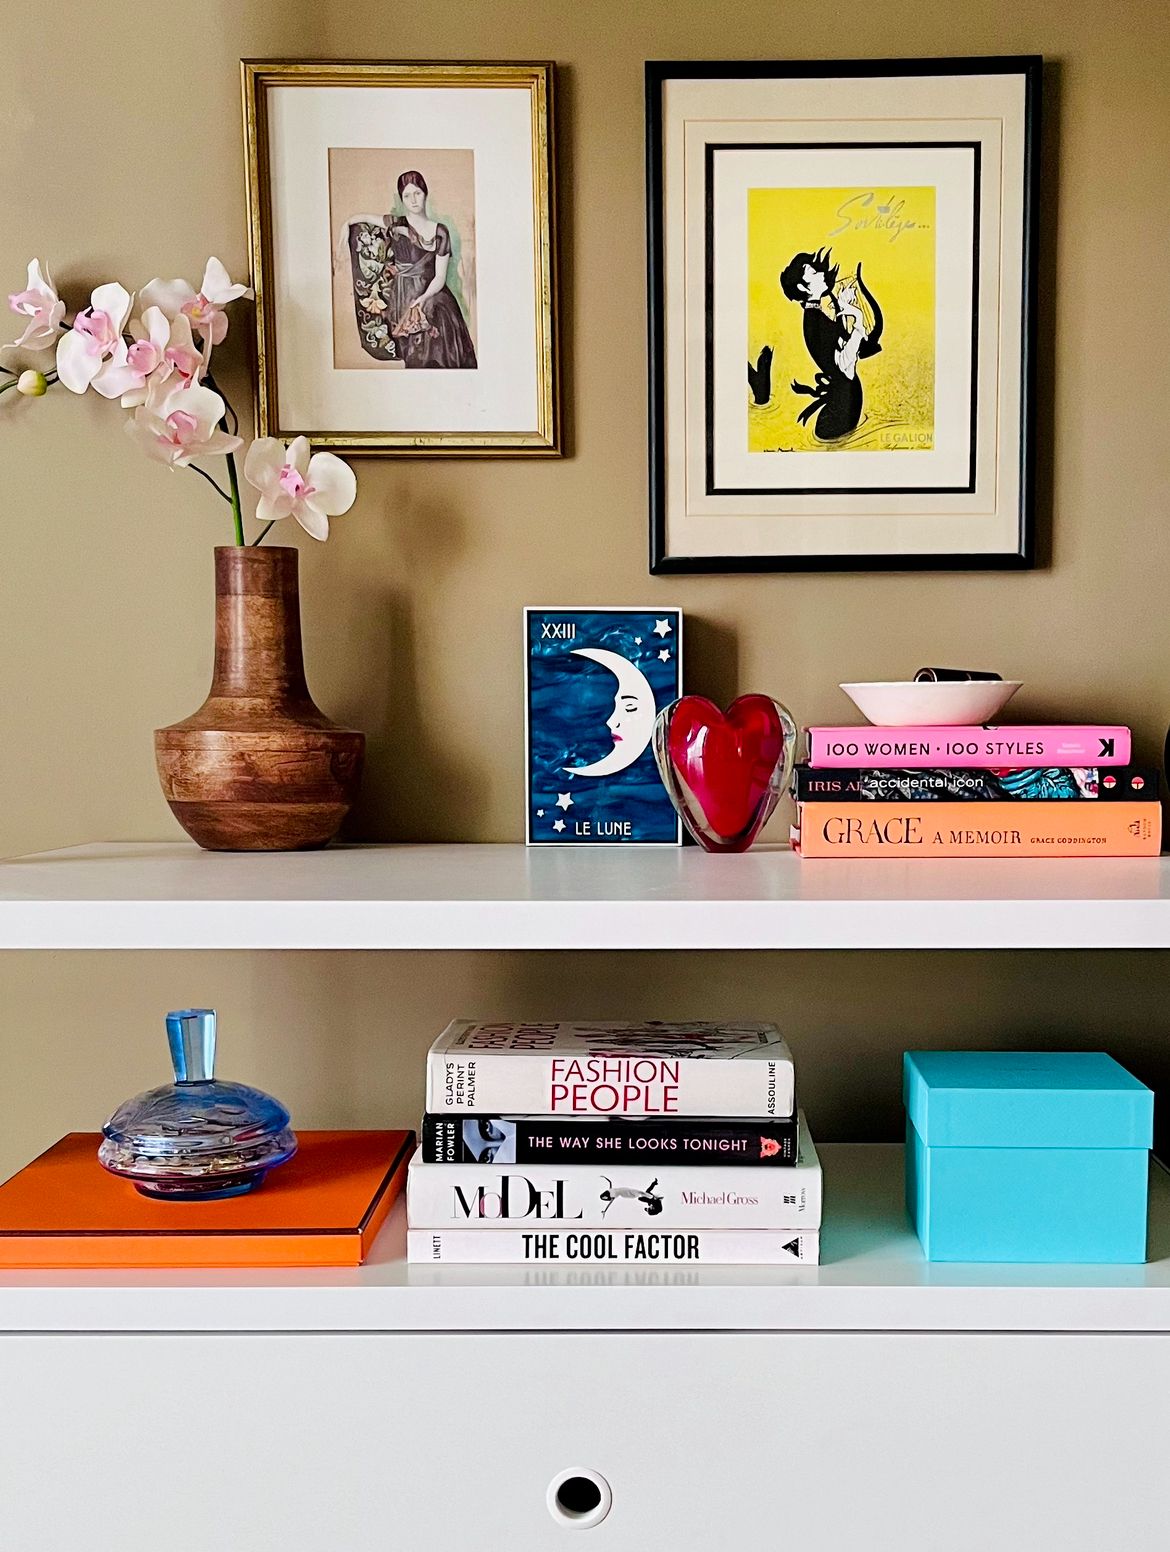
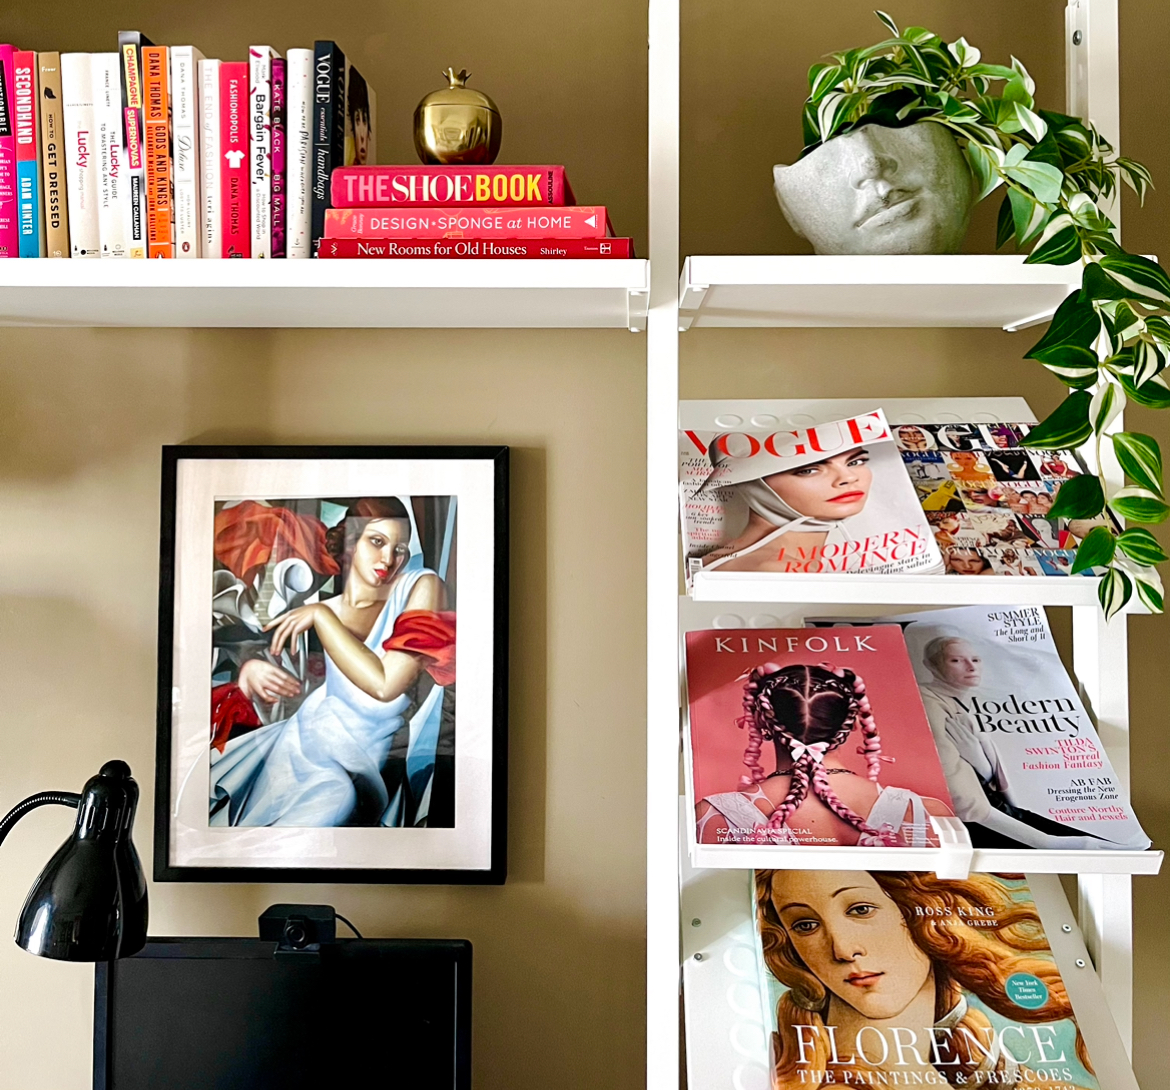
I reused objects from different parts of the house, which meant rearranging those spaces too. I love doing that – it’s a way to refresh the look of the house and display loved objects in new ways. My old vanity went to my daughter, who got a room refresh of her own this way. Filling the slanted shelves with fashion coffee table books and magazines inspired me to make that a kind of theme for my decorating, so I pulled most of my fashion books from the main library and created a specialty mini library here. As a bonus, that freed up space in the main library, where it was badly needed. The only sacrifice was my picture gallery; there is simply not enough room for all the pictures that used to hang on this wall. I was able to move most of them to other parts of the house, but some had to go into storage for the time being. They may see another day in the spotlight in a future refresh.

Overall, this was a most satisfying DIY – relatively quick, maximum impact. All told, the Elvarli unit cost just under $1,000 in materials and required no actual hacking, only assembly. I also splurged on a new chair, to match the height of the desk and upgrade my comfort level, but it was under $150 (on sale) at Costco. It doesn’t really fit the aesthetic, but for the time being, practical realities take precedence; in the future, when I don’t have to spend as much time working at this desk, I’ll switch it out for something a bit more elegant. For now, this work space is everything I asked for and more!

What I Wore: Bonjour, Montreal

I loved visiting Montréal (and my bestie) so much last year, I decided to make it a family affair this year, so we took the kids and flew out for a week’s adventure in la belle province. We were also there to celebrate my bestie’s convocation (as valedictorian!) from McGill University. We all had a wonderful time catching up, exploring, and enjoying sights, the museums, the cafes and restaurants, the weather. It was a blast! My highlights were Old Port, Verdun beach (such a lovely surprise), St. Joseph’s Oratory, and all the flowers and murals we saw on our adventures. And, of course, watching my friend walk across the stage and give her speech to the entire Faculty of Arts graduating class of 2024.


And I did it all out of a carry-on! Seven days, one small suitcase*? Truly, my evolution as a savvy travel-packer is complete. While I did travel to Montreal before with just carry-on, I must point out that it was for only five days. Two extra days might not seem like a lot but, trust me, they are. Plus, this time, I also took a smaller tote than before as my personal item. And half of my carry-on was taken up by a gift I was bringing for my bestie. I am telling you! I did good.

My strategy was the same as last year, but refined in execution. I started, as before, with the footwear. Montreal is a destination that involves a lot of walking, so I knew I needed something very comfortable. I packed a pair of Birkenstocks as a back-up, but I wanted something a touch more elegant so I took a calculated risk with a pair of Sorel sandals I recently thrifted. They are black and white and have a somewhat sporty vibe, so that set the tone for the rest of my clothing choices. I decided to stick to a mostly black, white and blue theme, and go with a more streetwear kind of vibe as opposed to my more boho or preppy looks — again, suited to my primary footwear option. I did also pack a very light pair of dressier sandals, but since the sole of it wasn’t cushioned, I did not want to rely on it too much; I mostly took it because I knew I needed one dressy outfit to celebrate my bestie’s McGill convocation.

I wore my heaviest clothes on the plane, natch: my oversized denim jacket, white tee, sweatshirt and sweatpants, and sneakers.

I included the sweatshirt at the last minute, as the weather forecast raised some questions. I picked one that could be mixed and matched with at least 2 other main pieces (the polka dot skirt and the black dress). The jacket was chosen because I know it would go with pretty much anything else, in the event I needed a topper every day. As it turned out, the sweatshirt was entirely de trop as the weather was much warmer than anticipated; even on the plane, it was too hot. The jacket, on the other hand, was the perfect choice. I was able to wear it most days comfortably, thus cutting down the need to slather my arms in sunscreen.

As for the rest, here is what I packed: 2 skirts, 2 dresses, 1 vest, 1 black cardigan, 1 black turtleneck, 2 white tees, 1 graphic tee. The turtleneck and cardigan were hedges against cooler weather; I didn’t end up wearing the former at all, and only wore the cardigan once, when we went to the oratory and I needed something to cover my arms (but not too bulky). You may think 3 white tees (in total) plus a graphic tee would be overkill, but most of my outfits were planned around wearing a white tee, and I didn’t want to have to worry about laundry during the trip. They didn’t take up a lot of room, so it was fine.

For all that, I ended up with some pretty fun outfits even though my goal was practicality not style.

I know these photos look like they were snapped with a potato, but such are the hazards of on-the-go photo shoots. It was so sunny in Montreal that finding a good spot to take pics proved extremely challenging, especially since I had about 30 seconds each day to do it. But I hope you get the general idea. This was, believe it or not, one of my white tees (not a strange grey one). I wore my denim jacket over this, and it was a good topper choice for the weather that day. The sandals proved to be suuuper comfortable too.

This outfit also turned out quite well. However, after 2 days and tens of thousands of steps, the sandals started to really bite into my ankle bones. I tried using bandaids to relieve the pain, but to no avail. This was a real bummer as they were otherwise perfect for walking. I’m hoping that, once my ankle bones stop hurting, I’ll be able to wear these again for shorter periods of time.

This was a bit of an improvised outfit, as we ended up with a last-minute itinerary made up of rather different activities. We hit up Verdun beach in the morning, which meant I needed something that could easily go over my swimsuit; from the beach, we headed to the Oratory, which meant that I had to look presentable and also have my shoulders and knees covered. This outfit ended up working fine. I switched to my Birks, not just for the comfort but also because they’re plastic and, thus, good choices for beach footwear; being black, they can almost pass for regular sandals.

After all that, I needed a change of clothes for dinner and stroll around town. I switched to my Chie Mihara sandals for this, and was pleasantly surprised that, despite the flat sole, they were very comfortable for walking a longer distance.

By the point, the weather had become quite hot, so I only wore the jacket for a little bit. The black top underneath is sleeveless, which helped to keep me well ventilated. The sandals continued to serve me well; very comfortable and also versatile. Not winning any style wars here, but such is the compromise of traveling light and not paying extra fees to Air Canada.

This was the outfit I wore for my bestie’s convocation, and it was a good choice for both the occasion and the weather. A statement belt can do a lot of heavy lifting, and takes up very little room in one’s luggage. Duly noted for future reference.

À la prochaine, Montréal!

* I feel compelled to clarify that each of my family members had their own carry-on. No, I did not attempt to dress 4 people for 7 days out of one bag. There are limits to my packing abilities, friends, and I do not possess Mary Poppins’ luggage.

Scent Stories: Purple Reign

Over the last few months I have become fascinated with perfumes — the science, the history, the subculture. As someone who is neurodivergent, I have a deep-seated attraction to the ‘rabbit holes’ of niche interests, and perfume is an excellent exemplar. I plunged head-first, like Alice, into a wonderful adventure. A couple of things became obvious very quickly. One, I can’t actually wear a lot of perfumes; many of them give me headaches and/or are simply not fragrances I enjoy as part of my day-to-day sensory environment. Two, I don’t like spending a lot of money on perfume, and perfumes tend to cost a lot of money. So I decided to bifurcate my hobby. On one hand, I want to develop my “nose” for scent by testing as many perfumes as I can, and reading up on the history and art of perfumery. On the other hand, I want to curate a small collection of perfumes for personal daily use that suit my olfactory preferences. I’ve been posting about the first project on Instagram, as I go through a bunch of perfume samples I’d accumulated over the years, and some I’ve managed to get my hands on more recently. As for the second project … well, let’s talk about it here.

For the second nostalgic addition to my collection, after Calyx, I chose a perfume I wore obsessively in my early 20s (along with D&G Light Blue): Paco Rabanne Ultraviolet. Launched in 1999, it’s classified as an “amber floral” scent. To me, it’s all violet, all the way. It doesn’t appear to be sold here in stores anymore, but I was able to score a bottle on FragranceNet for about $60CAD. It was my first time ordering through that website, and I was pleased with the experience. The perfume is much as I remember it: a sweet violet bomb. I suppose it’s not very sophisticated; perfume aficionada Tania Sanchez wrote of it that “bathrooms in hell smell like this” which made me laugh because it’s so random and pithy and very par for the course — she and Luca Turin almost inevitably hate every perfume I love (apart from Calyx). Anyway, here are my less pithy thoughts on Ultraviolet:

First impression: sweet violet with a little metallic/peppery tang. There is only minimal progression from this, apart from a slowly developing fruitiness (probably from the apricot and amber notes). It’s a very warm and sweet fragrance, but not cloying — equal parts floral and fruity. The candy-like violet remains center stage throughout. The longevity is quite good: 5+ hours on skin, longer if sprayed on clothes.

It shares some DNA with Lolita Lempicka, but it’s more peppery and violet-y and has no licorice. I recently sniffed a magazine sample of Paco Rabanne Lady Million, and was surprised by a slight similarity to Ultraviolet — Lady Million is like a very toned down, less violety version of it. I will need to test it in person to see if that comparison holds up.

My next “purple” purchase was inspired by my husband. Well, by his signature scent, to be precise. He has been wearing L’Eau de Issey Pour Homme (by Issey Miyake) for more than 20 years — though, like me, he stopped wearing scent on a daily basis in the last 5 or 6 years. Recently, he sprayed some, and I was surprised by how much I loved it … for me! It’s an aquatic fragrance, so no real surprise there, as that’s one of my favourite categories of scents. I decided that I would buy the women’s version, which I figured would smell similar but with a slightly less masculine dry down. (I have since decided that I don’t mind Pour Homme’s dry down.) I’m glad I didn’t end up blind-buying it, though — aka buy without smelling first — because when I randomly stopped in at a Shoppers Drugmart that carried the Issey line, and did an in-person sniff test, I found the women’s L’Eau de Issey to be very different. It smelled much more floral and lacks the yuzu note, which is a shame because that’s my favourite element in the men’s version. But while I was at the store, I tried another Issey perfume and fell in love with it: A Drop d’Issey. This one, too, is more of a “freshie” floral than an aquatic scent, but what makes it irresistible for me — and my husband! — is the lilac note. I ended up getting a bottle from FragranceNet as well, for about $60.

First impressions: lilacs in the breeze. It’s making me think of white sheets billowing on a drying line in a garden filled with lilac trees in bloom on a spring morning. It’s very fresh, not powdery at all. As it develops, the fragrance becomes very creamy (there is an almond milk note that complements the lilac beautifully) but it remains light and fresh. And very lilac-y. I love it. After a couple of hours, on the skin the scent fades to a ‘clean’ white floral not dissimilar from Replica Lazy Sunday Morning. I usually only spray directly on my skin, but one time I accidentally sprayed a bit on my clothes as well, and the lilac note lingered all day; I would get whiffs of it every now and then and it was lovely. A little bit definitely goes a long way if you’re spraying clothes.

OK, so we’ve talked about violets and lilacs, and if I tell you there is one more “purple” scent to mention, what comes to mind? That’s right: iris. I love irises and I find their use in perfumery really fascinating. The smell of actual iris flowers is rather sweet, but what’s often used in perfume is iris root (also known as orris or orris butter) which has a very different scent profile — it’s powdery with hints of earthiness. To recreate the smell of iris flowers, a lot of perfumes add violet notes. My understanding is that, at the molecular level, iris and violet notes are quite similar, being different types of ionones. (Fun fact: ionone comes from the Greek work “iona” which means violet.) Iris perfumes are often described as melancholy which I find strangely irresistible as a concept — don’t ask me why! Maybe it’s a Gen X thing. Anyway. I spent WEEKS researching iris perfumes online with the goal of identifying one perfume that would represent that note in my collection, in a way that most appealed to me. I knew I wanted something that wasn’t too dry and powdery, but rather with at least a hint of sweetness to it. Orris is one of the most expensive perfume components, so most of the perfumes commonly listed as the ‘best’ iris fragrances are expensive ones. For example, Serge Lutens’ Iris Silver Mist tops most of those lists and it costs $300USD for 75 ml — far outside my budget; it’s also not easily accessible to test. I am ok with blind-buying fragrances up to a certain price point, but we are talking, like, $50 here, not $300.

After many deep dives, I finally came up with an candidate that looked to fit my profile and budget. The downside? It had to be a blind buy. And it was a teeeeny bit more expensive than my usual blind buys. Oops.

Yves Rocher is a French cosmetics brand whose perfumes aren’t super well-known here, so it was a bit of random luck that (a) I came across some reviews of Iris Noir, and (b) found a brand new bottle on Poshmark. Doubly so since it’s been discontinued. I paid $65 (all in) for a 50 ml bottle, brand new in its original packaging, which was close enough to my blind buy threshold to be acceptable. The note pyramid listed for Iris Noir is intriguing — top notes of coriander and bergamot, middle notes of iris and ambrette, and base notes of patchouli and tonka — but some of the reviews I found referenced violet as well, which convinced me to pull the trigger. One of the other perfumes I had on my iris shortlist was Guerlain’s Insolence, which also pairs iris and violet, and Iris Noir was described as a similar, less sweet version of that. I was down to take a risk. And it paid off — thank god! I love Iris Noir, though it’s not exactly what I expected.

First impressions: slightly powdery herbal floral. By “herbal” I mean sort of green and rooty. But within seconds, the violet hits. It’s not as sweet (or metallic) as in Ultraviolet, but it’s definitely violet. Early on, it’s more creamy than powdery, and quite warm. Honestly, on me, the balance tips more towards violet than iris, which isn’t a terrible thing because I love that note, but I do wish I could smell more of the iris. After about an hour or so, it does become more powdery, though I can still smell the violet. Longevity is so-so; after a couple of hours, what remains is mostly just a “clean skin” kind of smell.

Overall, to me, Iris Noir is like a more elegant and sophisticated version of Ultraviolet and Lolita Lempicka. I don’t find it particularly melancholy, though it does have a low-key seductive vibe about it. Having since smelled a couple of the other fragrances on my iris/violet shortlist, I can also say that it’s (a) less sweet and more reserved than Insolence, and (b) more sweet and violet-y than Balenciaga Paris, which pairs violet with violet leaf (and carnation) for a different effect — a greener and slightly spicier fragrance. (The difference between violet and violet leaf is an important one if you are researching perfumes based on the notes. Violet leaf is less sweet and more unisex as a scent profile.)

I will have to use Iris Noir judiciously since it is discontinued and my chances of finding another bottle are probably slim, but I’m very happy to have it in my collection for now. I think I am also going to keep looking for a candidate to fill the “melancholy iris” spot in my collection. Any ideas? Leave them in the comments.