Category: DIY

We Did A Thing, Vol. 10

This past January marked 8 years since my husband and I bought our home. It’s hard to believe that we have spent almost a decade – our entire married life – in this place. One, because I have trouble understanding how EIGHT WHOLE YEARS could have passed without my feeling any older; and two, because most of the people we know have moved on – usually to newer and/or bigger homes – during that time. [I guess I could have added a third to that list: the fact that some of the projects we started when we moved in are still not, um, quite finished. Ahem, the-basement-of-which-we-shall-not-speak-again.] But here we are, still keeping the promise we made all those years ago to “never move again until we’re 60”.

Making do, as it were, has never been a big problem. With 2 growing kids, our 1,600 square feet of livable space feel a bit more cramped than before, but it’s also about as much house – and maintenance – as we can handle as busy working parents. What we have been slowly doing over the past decade is to make-over our home to make it better suited to our needs and tastes. Emphasis on “slowly”. Sadly, as much as I bemoan this fact with every project, life is not as speedy and convenient as an HGTV show, especially when you’re relying almost solely on sweat equity. On the bright side, my marriage has now survived a number of home DYI projects, so I think we’re doing pretty well.

It helps a lot that my husband and I are on the same page (mostly) when it comes to interior design. We both like a mix of Scandinavian Neoclassic (Gustavian) and Mid-Century Modern influences. The fly in the ointment, so to speak, is that we have what you might call champagne tastes on an IKEA budget. This is problem #1.

As far as décor goes, that mostly revolves around my various collections. My husband kindly indulges my collecting habits, which is a relief because (A) I have a few, and (B) it’s not hoarding if we both call it a “collection”. [I indulge his collecting, so we’re even. It also means that our garage is full of partially functioning vintage cars.] The tricky thing is finding space for all of my well-loved treasures. This is problem #2.

We have made various solutions to these problems over the years, most of them involving some form of built-ins. Our house is a builder’s basic package, so it came pretty much bereft of any architectural charm or distinction. I like built-ins because they add some character, not to mention functionality to even the most undistinguished of spaces. I loved how the built-ins that my husband constructed transformed our family room and master bedroom; last year, I decided it was time to work the same magic on our living room.

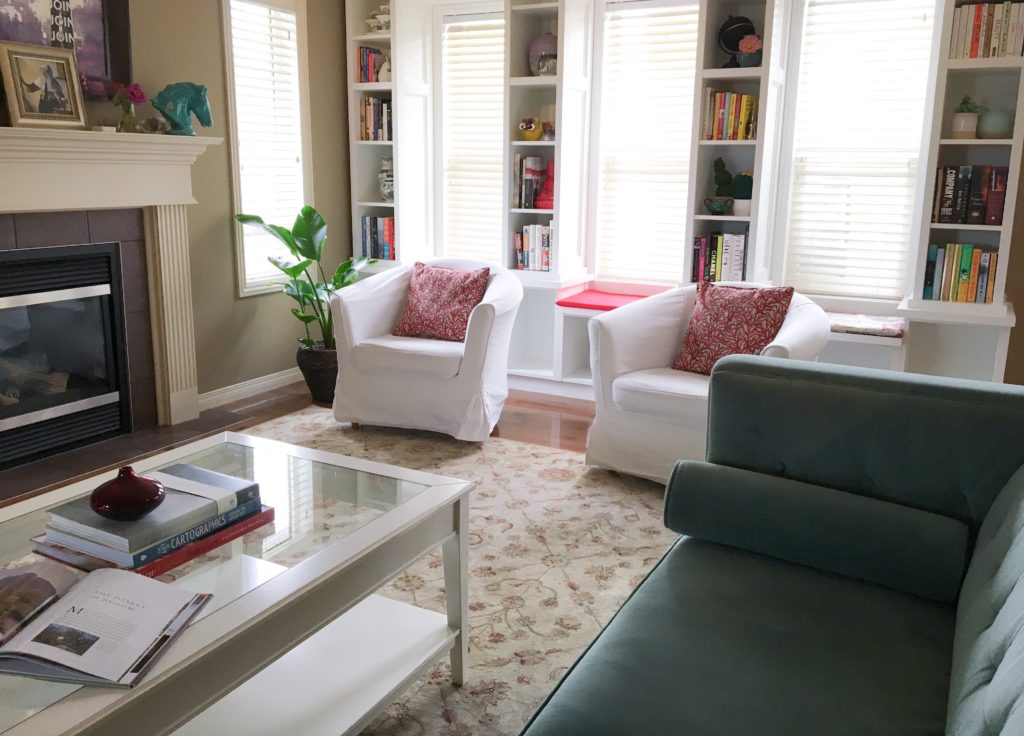
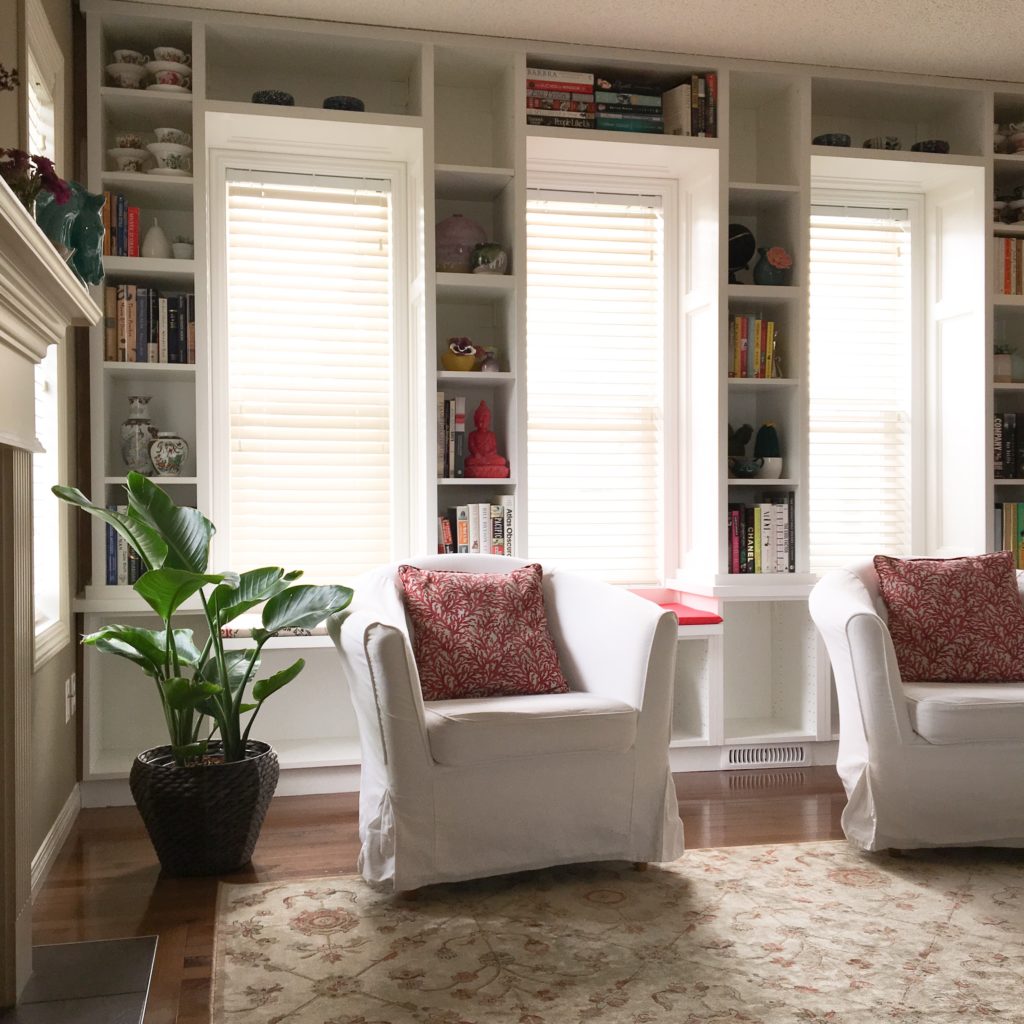
I have written about the evolution of our living room before. Adding built-ins around the windows seemed like a logical next step, both as an aesthetic choice and a practical one. As it was, the space was underutilized; built-in would give us more storage and more seating options, particularly when hosting.

Our living room after we moved in

69CD2522-627D-454C-9E3C-CF877D611E85

Our living room after the last round of updates

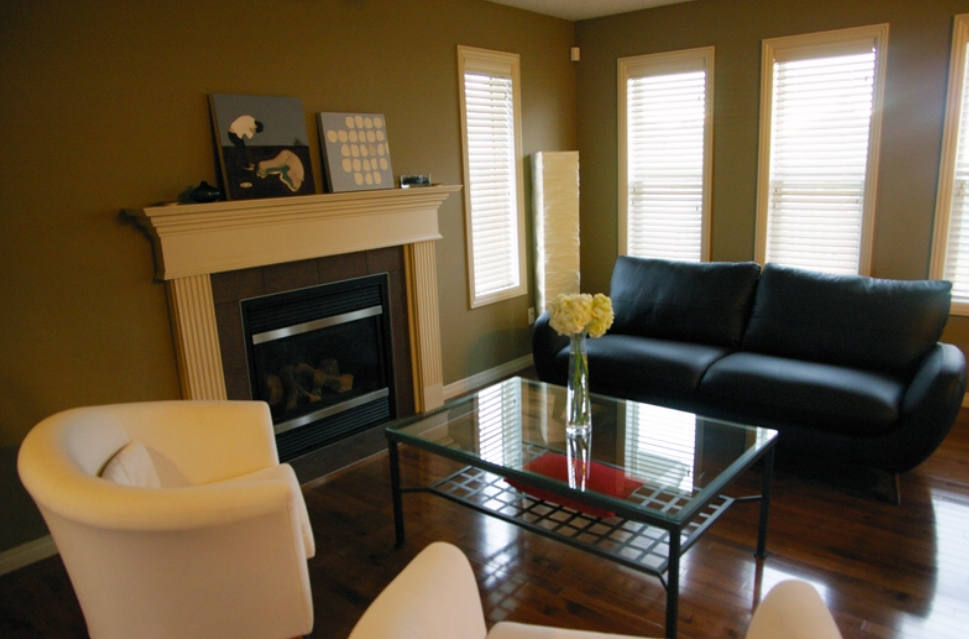
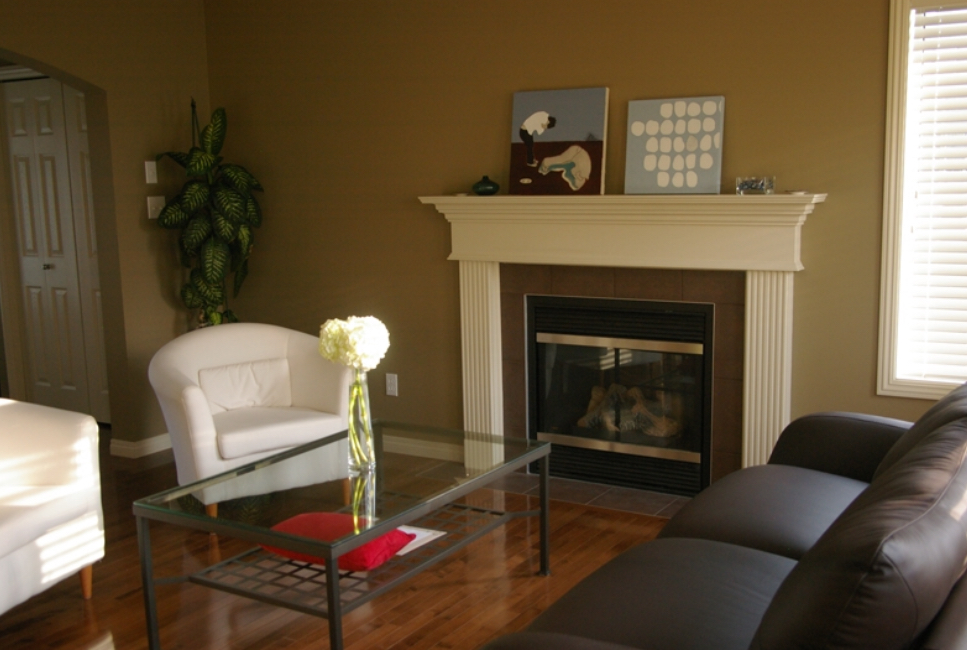
I brought my overall vision to my husband, who took the idea and went to town with it. Actually, he went to the IKEA website, because hacking basic IKEA boxes is one of his favourite things to do – and I’m being only a little facetious. He was able to design the whole custom ensemble for well under $1,000, using IKEA kitchen cabinets (on sale!) and wood trim from the hardware store. He is a keeper, that one. Anyway, don’t ask me how, but it all looked like this at the end:

After!
After!

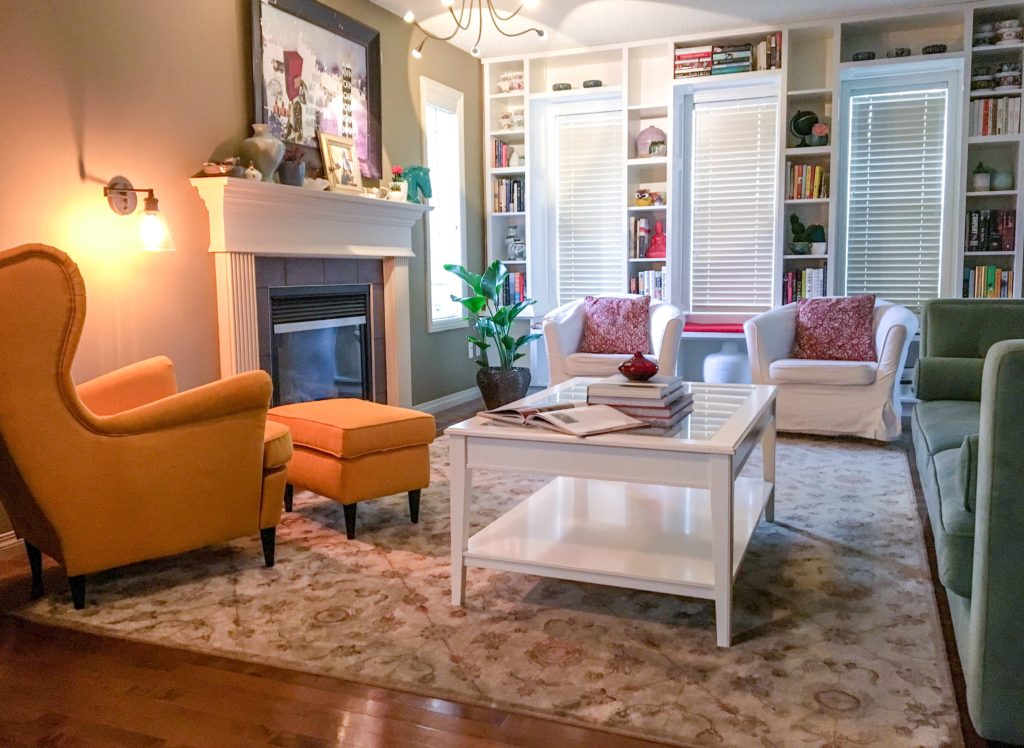
Other than providing the vision – it’s important, I tell you! – I also did the painting of the built-ins, And, of course, my favourite part: the decorating. There are still a few things we need to do (including patching some dings in the wall and eventually changing the wall colour, adding wainscotting, putting doors on the bottom of the built-in cabinet, and changing the light fixture) but we aren’t in a major rush. The space is livable and quite cozy, so I want to enjoy it – and some peace and quiet – for a bit before tackling more work.

C2D75193-4596-4680-988B-1E644D3011EF

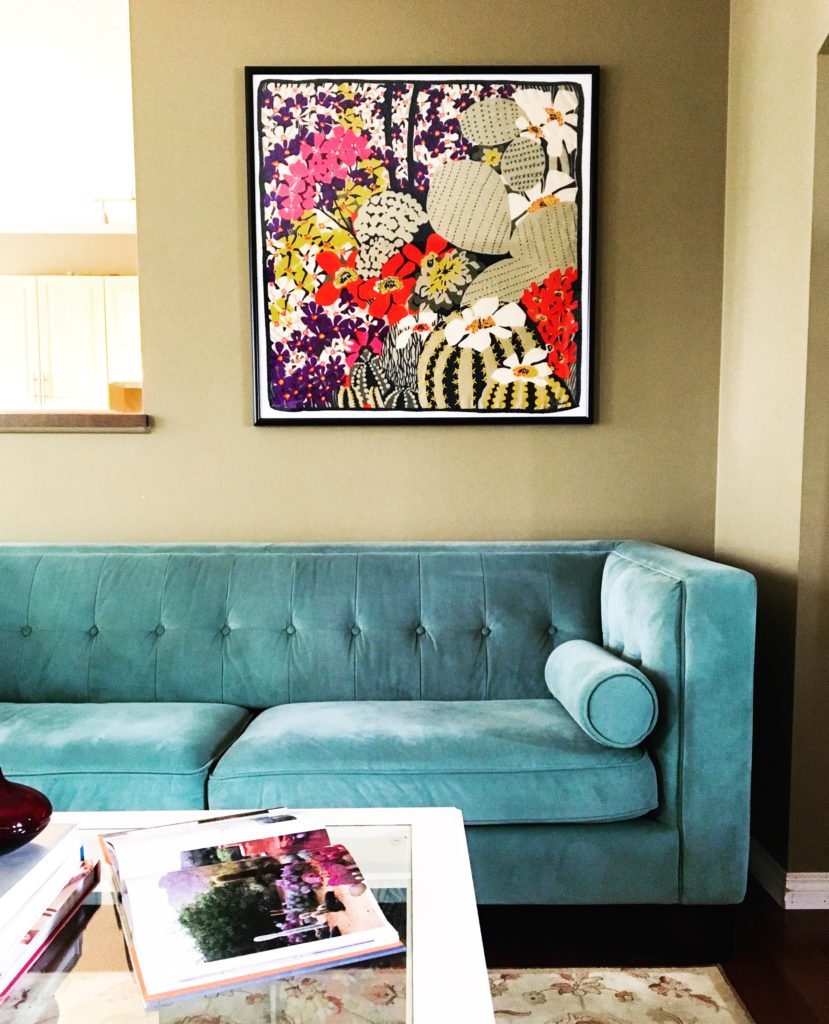
This was one of my fave mini DIY projects; we framed one of my thrifted finds, a vintage Italian silk scarf featuring my favourite succulents. The brand is La Mendola, and my internet research tells me that it was a Pucci rival in the 60s and 70s. I tried to thrift a frame, but the dimesions were too tricky (very large square) so we ended up with, what else, an IKEA poster frame. The scarf is simply sandwiched between the cardboard backing and the plexiglass, and seems to be staying in place. Up close, you can definitely see some ripples in the fabric, and the border is uneven, but I think that adds to its offbeat charm. All told, it cost about $30 (including the scarf) which is a great price for such a statement piece.

F1F62862-7178-4F90-AE27-7DD148097F79

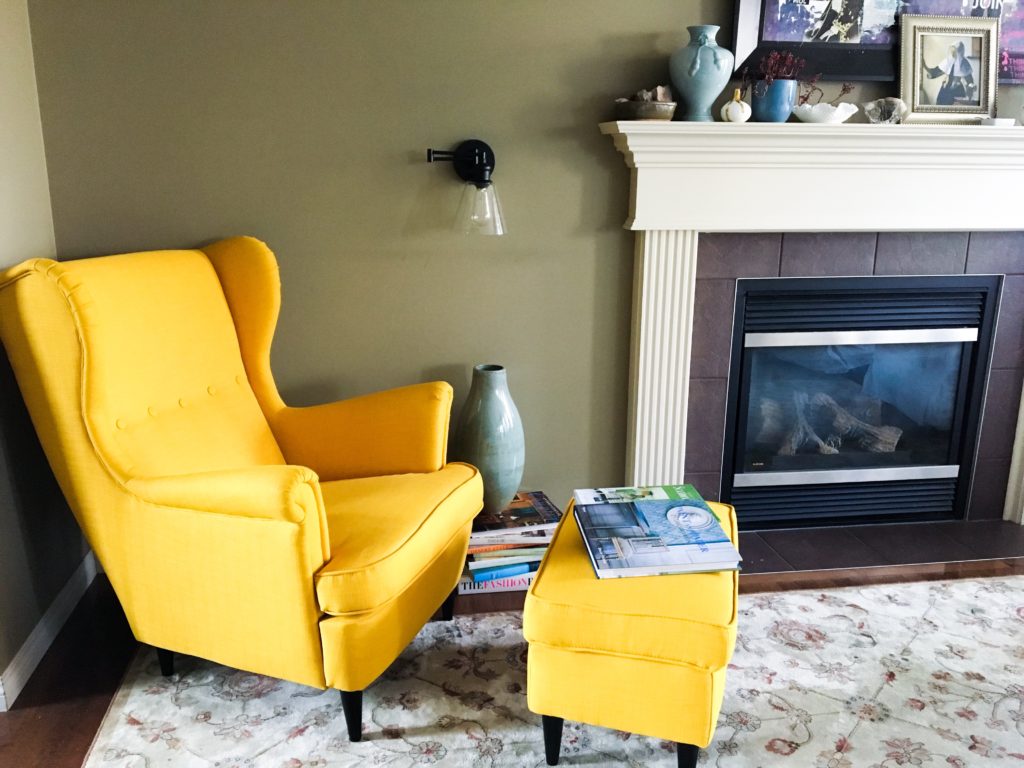
The trouble with IKEA is that you never leave with only the things you planned to buy. This chair is a case on point. I saw it as we were walking out of the store and ended up going back for it. My husband and I both loved the style and the vibrancy of the marigold yellow, which echoes some of the other decor in the living room and dining room. It’s a perfect reading nook, and it really brightens up the room. With this addition, the whole vibe leans more eclectic than traditiona, but I don’t mind; I think the “bones” of the room are classic, so it balances out.

Some more pics!

5843FCA8-80FF-492C-9C13-FDD4E0E24AFB

6375C844-831B-4E92-B304-E2C5AC08608E

All in all, another successful DYI on the bag at Casa J 🙂

I Did A Thing, Vol. 9

I finally feel like I’m hitting my stride with knitting, and I recently completed a few neat projects. A few things have helped. One, getting more comfortable with reading patterns so that I can make small adjustments to suit my purposes. Two, getting this “dictionary” of stitches – game changer! I keep looking for a book of interesting knitting projects, but haven’t found anything that features the kind of more offbeat projects I want. The internet is hit and miss in that regard; I find tons of cool inspo photos, but few free patterns. I totally get and respect why people would want to charge for their designs but, as a newbie, I cannot commit to buying something without seeing the instructions first and making sure the project is something I can feasibly complete. Sadly, most of the really neat-looking stuff is way beyond my current capabilities … or it involves crochet. I’m not ready to jump into that. Yet.

But, as I said, I have managed to finish a couple of projects that I quite like. One involves a free pattern I found online, and one is based on my own design. Want to have a look?

The Cacti Lover’s Dream

If you follow me on Instagram, you know that I fell in love with cacti on my trip to Phoenix earlier this year. This is not hyperbole; cacti are now in the top 5 of my favourite ornamental plants list – and I love flowers, a LOT. Anyway, this project is perfect for cacti lovers who, like me, are afraid of killing their darlings. This free pattern comes in a handy PDF format, and the instructions are easy to follow. You do need to be comfortable with working on double pointed needles (DPNs). This was intimidating at first. I tried subbing in circular needles, but quickly gave up; the largest cactus is only 31 stitches, which I found impossible to knit even on my shortest circular needles. Luckily, working in the round on DPNs, while finicky (for a beginner) is not too difficult to learn. Once knitted, assembling the cacti was also fairly easy. I stuffed them with extra fluffy leftover yarn, which probably wasn’t the best choice but was the most readily available (and cheapest) option. [Side-note: I think I ended up over-stuffing them, which stretched the knit material a little more than ideal. Lesson learned.]

AD05FF46-08BD-40A9-A198-61ED0055098B

Sewing the bobbles of the larger cactus together was the trickiest part, and I wasn’t particular “clean” in my finishing work. With that said, unless you’re looking at it closely, the “mistakes” are not very visible. If I were to do this project over again, I would spend more time on this part of it, but on my first try, I was excited to finish and rushed a bit.

6DBADFCA-D7C1-48E7-9DC5-D38C6908C859

The original design called for crocheted flowers, which was a no-go for me. I poked around the internet and finally found a very simple knit pattern, which I proceeded to adjust for my own purposes and added some beads for extra pizzazz.

The Embroidered Cross-body

This little purse combined a few of my previous efforts, and was super fun (and easy) to make – so much so that I made it twice! The design is very basic – just a long rectangle, folded over to make a clutch with a flap. Rather than sew in a snap, I decided to “weigh” down the flap. The metal ring is actually a “build your own” charm bracelet I got at Michaels; it comes with a little loop meant for attaching a charm, which I used to attach my handmade tassel. [There are tons of how-to videos on YouTube for making tassels, and it’s very easy.] Also from Michaels, I got the metal rings that I attached on the sides for clipping in the detachable cross-body strap; the strap itself was thrifted for $2 at Value Village.

CC1821EC-3868-453E-9A2F-32E5E38234C9

The floral patches were embroidered on felt, cut down to size, then sewn on (with beading) the knit material. Embroidering on felt is trickier than on muslin, but felt can be cut without having to worry about fraying edges – I learned this the hard way on another project.

I really love the results here; the purse is fairly sturdy for being knit, though of course it’s not intended to carry a ton of stuff. I can fit a small wallet, my keys, and a phone without problem. Once I figured out all of the design aspects, actually completing this project didn’t take very much time – maybe 3-4 hours in total.

5B176827-C9B9-4F65-88D7-753F314E0DAF

I Did A Thing, Vol. 8

It’s been a hot minute since the last time I wrote about my crafting adventures, and you guys must be dying for an update. No, it’s okay, you don’t have to rush to affirm my suspicion. Imma go ahead and give you that update anyway.

I go through phases with crafting, as with reading. Lately, I’ve been on a knitting kick. As I’ve written before, I have struggled far more with learning how to knit than I did with embroidery; I don’t find it as intuitive. Because I’m a contrary sort of person, the challenge is making me double down on knitting in this case – as opposed to give up, which is an equally likely response on my part to recreational endeavours that don’t go the way I want them to. Anyway, I’m knitting all the time, and I am determined to eventually make a finished product with which I can be 100% satisfied. I’m not there yet, but I’m moving slowly in the right direction.

I have learned a few basic patterns/stitches in the meantime, including garter, stockinette, ribbing, seed, rice, moss, star stitch, and Chinese weave. In the course of my struggle with seed stitch, I finally learned how to read my stitches, which has been a tremendous help. I would like to experiment more with slip stitch patterns, but for now, I am focusing my energies on the aforementioned quest to make some sort of useful product.

I did make a striped scarf, which didn’t turn out too badly.

98D8AD0F-6966-4DA9-AAB5-C9C7DD1D5341

Making one of sufficient size – I like my scarves to resemble blankets, really – takes a long time, but it’s not difficult. I could just stick to making these in perpetuity (there is an almost infinite number of colour combinations to pursue) but how many scarves does one woman – and her nearest and dearest – need? Finding simple patterns online for making non-scarf items has been challenging. I bought a book of patterns, but later realized that they were all either too advanced for me (all the ones I liked, basically) or not quite my style. There was an exception; I did use one of the easier patterns to make a very nice scarf for my husband.

4BC6E0BA-F53D-453E-92FA-68C775409286

My own pattern-making skills are laughable, so I haven’t tried anything too adventurous. This was my first attempt at an envelope-style clutch:

ADA01833-9999-4E87-80F4-04016AEF900C

For the record, this was supposed to be done in seed stitch, but I messed up – which is what happens when you try to follow online instructions, and also don’t know how to read your knitting. Anyway, I think the rib stitch works just fine for this. I added a snap and a decorative brooch (an old beading project) and was not wholly displeased with the result.

My most recent attempt at a self-made pattern was an obi-style wrap belt. To back up, I learned a bit about increasing and decreasing by following a headband pattern I found online (this one). Here’s a pic of that project:

4D9D3805-42DA-4374-9E78-B1984177A696

I used a slightly modified approach to make my belt. On the ends, rather than increasing by one stitch every other row, I increased by 2 (one at each end of the row). The body of the belt was done using a star stitch pattern; I mostly eyeballed the width, and the nice thing about this type of design is that it can be customized pretty easily.

153A1274-5136-4146-A6A2-D8C676CB31E4

The hardest parts to make were actually the ties; I braided them out of the same yarn as the rest of the belt, but then decided to get fancy and add beads at the end of each “tassel”. Threading them onto the yarn was a total pain in the you-know-what. Still, I think the result looked pretty good.

A94083B6-37C3-4D45-8C9F-3A2A228643F3

C44B6E9F-C52F-46F0-A20B-9404B29C21C1

That about sums up my recent knitting adventures. If you have easy (and free) patterns to recommend for my next project(s), leave me a comment!